Getting Started with Shigola
The quickest way to your first vector tile server is via using this example repository. At the end of this exercise you will have an understanding of how to setup and configure Shigola. You will also have created your first client application utilizing vector tiles.
Let's get started!
Prerequisites
- Install Docker for your OS.
Clone the example repository into a location of your choosing.
git clone https://github.com/go-spatial/tegola-example-bonn.git
cd tegola-example-bonn
Next up, you start Shigola and Postgres/PostGIS in a containerized environment
docker compose up
This will take care of
- unpacking the example data
- starting all required services
- database migration
wait until the migration step exits and you're done.
Check it is serving
This example comes with the mvt_postgis provider. After you ran the prerequisites,
http://localhost:8080/ returns the OGC API - Tiles landing page — a JSON
document — and http://localhost:8080/collections lists your data as OGC collections.
Every map is published as a collection, and so is every one of its layers — bonn for the whole map,
bonn:landuse for one layer (for more on layers see
provider layers).
To see the tiles on a map, point a client at them: the tutorials do this with MapLibre, OpenLayers and Mapbox GL.
Your first vector map
Shigola delivers geospatial vector tile data to any requesting client. For simplicity, we'll be setting up a basic HTML page as our client that will display the rendered map. We'll be using the OpenLayers client side library to display and style the vector tile content.
Create a new HTML file, copy in the contents below, and open in a browser:
<!DOCTYPE html>
<html>
  <head>
    <title>Shigola Sample</title>
    <link
      rel="stylesheet"
      href="https://cdn.rawgit.com/openlayers/openlayers.github.io/master/en/v5.3.0/css/ol.css"
      type="text/css"
    />
    <script src="https://cdn.rawgit.com/openlayers/openlayers.github.io/master/en/v5.3.0/build/ol.js"></script>
    <style>
      #map {
        width: 100%;
        height: 100%;
        position: absolute;
        background: #f8f4f0;
      }
    </style>
  </head>
  <body>
    <div id="map"></div>
    <script>
      var map = new ol.Map({
        layers: [
          new ol.layer.VectorTile({
            source: new ol.source.VectorTile({
              attributions:
                '© <a href="http://www.openstreetmap.org/copyright">' +
                "OpenStreetMap contributors</a>",
              format: new ol.format.MVT(),
              tileGrid: ol.tilegrid.createXYZ({ maxZoom: 22 }),
              tilePixelRatio: 16,
              url: "/collections/bonn/tiles/WebMercatorQuad/{z}/{y}/{x}",
            }),
          }),
        ],
        target: "map",
        view: new ol.View({
          //coordinates the map will center on initially
          center: [790793.4954921771, 6574927.869849075],
          zoom: 14,
        }),
      });
    </script>
  </body>
</html>
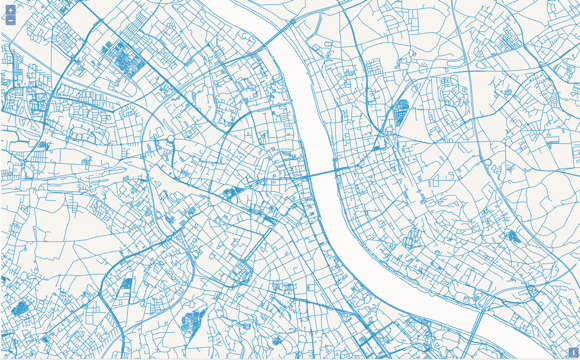
If everything was successful, you should see a map of Bonn in your browser.
Next steps
- Check out how to create your own config
- Check out our other tutorials and start using your own data!
- Explore OGC API - Tiles, tile matrix sets and the layered cache.
- Join gophers#go-spatial on slack and show us what you built with shigola!