Getting started
Developer Guide step-by-step
The following guide will help you understand, Step-by-step the best practices of how to work with the MapColonies Raster Catalog and how to consume Raster products in a dynamic way (materials might be changed or added).
If you only want to view the layers or their metadata or other information (Product_ID, region, etc.) you may go to the MapColonies catalog application, locate the required layer and view the information there.
Flow diagram
Query Catalog Service (Step 1)
Query Raster CSW catalog service to find item(s) according to a desired filter.
See some examples here.
- Specific Layer
- Fetch All Layers (Pagination)
To fetch a specific layer you need the following values:
productIdproductType
Both can be coppied from our catalog app.
When you have these values in hand you can make a POST request to <RASTER-CATALOG-SERVICE_URL>/csw with the following body (replace productId and productType with real values):
<?xml version="1.0" encoding="UTF-8"?>
<csw:GetRecords xmlns:csw="http://www.opengis.net/cat/csw/2.0.2" service="CSW" maxRecords="1" startPosition="1" outputSchema="http://schema.mapcolonies.com/raster" version="2.0.2" xmlns:mc="http://schema.mapcolonies.com/raster" >
  <csw:Query typeNames="mc:MCRasterRecord">
   <csw:ElementSetName>full</csw:ElementSetName>
    <csw:Constraint version="1.1.0">
      <Filter xmlns="http://www.opengis.net/ogc">
        <And>
          <PropertyIsEqualTo>
            <PropertyName>mc:productId</PropertyName>
            <Literal>productId</Literal>
          </PropertyIsEqualTo>
          <PropertyIsEqualTo>
            <PropertyName>mc:productType</PropertyName>
            <Literal>productType</Literal>
          </PropertyIsEqualTo>
        </And>
      </Filter>
    </csw:Constraint>
  </csw:Query>
</csw:GetRecords>
You can enquire all raster products with the following POST request to <RASTER-CATALOG-SERVICE_URL>/csw (use maxRecords and startPosition for pagination):
<?xml version="1.0" encoding="UTF-8"?>
<csw:GetRecords xmlns:csw="http://www.opengis.net/cat/csw/2.0.2" service="CSW" maxRecords="1" startPosition="1" outputSchema="http://schema.mapcolonies.com/raster" version="2.0.2" xmlns:mc="http://schema.mapcolonies.com/raster">
  <csw:Query typeNames="mc:MCRasterRecord">
   <csw:ElementSetName>full</csw:ElementSetName>
    <csw:Constraint version="1.1.0">
      <Filter xmlns="http://www.opengis.net/ogc">
        <PropertyIsEqualTo>
          <PropertyName>mc:type</PropertyName>
          <Literal>RECORD_RASTER</Literal>
        </PropertyIsEqualTo>
      </Filter>
    </csw:Constraint>
  </csw:Query>
</csw:GetRecords>
You will get an XML Response with product metadata:
Response example
  <?xml version="1.0" encoding="UTF-8" standalone="no"?>
  <!-- pycsw 2.7.dev0 -->
  <csw:GetRecordsResponse xmlns:csw="http://www.opengis.net/cat/csw/2.0.2" xmlns:dc="http://purl.org/dc/elements/1.1/" xmlns:dct="http://purl.org/dc/terms/" xmlns:gmd="http://www.isotc211.org/2005/gmd" xmlns:gml="http://www.opengis.net/gml" xmlns:ows="http://www.opengis.net/ows" xmlns:xs="http://www.w3.org/2001/XMLSchema" xmlns:xsi="http://www.w3.org/2001/XMLSchema-instance" xmlns:mc="http://schema.mapcolonies.com/raster" version="2.0.2" xsi:schemaLocation="http://www.opengis.net/cat/csw/2.0.2 http://schemas.opengis.net/csw/2.0.2/CSW-discovery.xsd">
      <csw:SearchStatus timestamp="2022-02-15T15:08:58Z"/>
      <csw:SearchResults numberOfRecordsMatched="2" numberOfRecordsReturned="1" nextRecord="2" recordSchema="http://schema.mapcolonies.com/raster" elementSet="full">
          <mc:MCRasterRecord>
              <mc:classification>4</mc:classification>
              <mc:creationDateUTC>2022-02-13T13:04:23Z</mc:creationDateUTC>
              <mc:description>World Wide 2020</mc:description>
              <mc:footprint>{"type":"Polygon","coordinates":[[[-180,-90],[-180,90],[180,90],[180,-90],[-180,-90]]]}</mc:footprint>
              <mc:minHorizontalAccuracyCE90>3</mc:minHorizontalAccuracyCE90>
              <mc:id>3b3164a7-280d-4392-a82f-d60a76e69092</mc:id>
              <mc:ingestionDate>2022-02-13T13:04:23Z</mc:ingestionDate>
              <mc:insertDate>2022-02-13T13:04:41Z</mc:insertDate>
              <mc:mimeType>image/jpeg</mc:mimeType>
              <mc:links scheme="WMS" name="ORTHOPHOTO_MOSAIC_BASE" description="">'<YOUR_MAPPROXY_URL>/service?REQUEST=GetCapabilities'</mc:links>
              <mc:links scheme="WMS_BASE" name="ORTHOPHOTO_MOSAIC_BASE" description="">'<YOUR_MAPPROXY_URL>/wms'</mc:links>
              <mc:links scheme="WMTS" name="ORTHOPHOTO_MOSAIC_BASE" description="">'<YOUR_MAPPROXY_URL>/wmts/1.0.0/WMTSCapabilities.xml'</mc:links>
              <mc:links scheme="WMTS_KVP" name="ORTHOPHOTO_MOSAIC_BASE" description="">'<YOUR_MAPPROXY_URL>/service?REQUEST=GetCapabilities&SERVICE=WMTS'</mc:links>
              <mc:links scheme="WMTS_BASE" name="ORTHOPHOTO_MOSAIC_BASE" description="">'<YOUR_MAPPROXY_URL>/wmts'</mc:links>
              <mc:maxResolutionMeter>0.1</mc:maxResolutionMeter>
              <mc:producerName>PRODUCER</mc:producerName>
              <mc:productBBox>-180,-90,180,90</mc:productBBox>
              <mc:productId>ORTHOPHOTO_MOSAIC_BASE</mc:productId>
              <mc:productName>אורתופוטו מתעדכן</mc:productName>
              <mc:productType>OrthophotoBest</mc:productType>
              <mc:productVersion>1.0</mc:productVersion>
              <mc:region>World</mc:region>
              <mc:maxResolutionDeg>0.000171661376953125</mc:maxResolutionDeg>
              <mc:sensors>UNDEFINED</mc:sensors>
              <mc:imagingTimeEndUTC>2020-05-21</mc:imagingTimeEndUTC>
              <mc:imagingTimeBeginUTC>2020-05-21</mc:imagingTimeBeginUTC>
              <mc:SRS>4326</mc:SRS>
              <mc:SRSName>WGS84GEO</mc:SRSName>
              <mc:transparency>OPAQUE</mc:transparency>
              <mc:type>RECORD_RASTER</mc:type>
              <mc:updateDateUTC>2022-02-13T13:03:07Z</mc:updateDateUTC>
              <ows:BoundingBox crs="urn:x-ogc:def:crs:EPSG:6.11:4326" dimensions="2">
                  <ows:LowerCorner>-180.0 90.0</ows:LowerCorner>
                  <ows:UpperCorner>180.0 90.0</ows:UpperCorner>
              </ows:BoundingBox>
          </mc:MCRasterRecord>
      </csw:SearchResults>
  </csw:GetRecordsResponse>
Notice that you need to set 'outputSchema="http://schema.mapcolonies.com/raster"' in order to get the full catalog data
Extract product Bounding Box (Step 2)
Some of our layers cover only specific parts of the world, this means that not all requests will return data. When making requests we want to make sure our map viewer knows where there's data.
In order to do this we want to supply the map viewer with the layer's defined areas, in this case the product BBOX (aka ‘extent’). We can get this from the metadata response of the product.
Look for the <ows:BoundingBox></ows:BoundingBox> element in the response from the catalog.
Another way to find the product extent is to look for the <mc:footprint></mc:footprint> element.
In the example in the last step, the response xml file looks like this:
<mc:footprint>{"type":"Polygon","coordinates":[[[-180,-90],[-180,90],[180,90],[180,-90],[-180,-90]]]}</mc:footprint>
Use any tool (CesiumJS, turfJS, etc..) to convert the footprint (GeoJSON) into a bounding box.
For example using CesiumJS and turfJS:
import bbox from '@turf/bbox';
import { Rectangle } from 'cesium';
import { LayerRasterRecord } from '../models';

export const generateLayerRectangle = (layer: LayerRasterRecord): Rectangle => {
  return Rectangle.fromDegrees(...bbox(layer.footprint));
};
After you’ve got your product bounding box lets move to the next step.
Get layer URI (Step 3)
In the catalog response from the first step, look for the links tags.
Each layer has it's own links, so make sure to filter for your wanted layer
<mc:links scheme="WMTS" name="[desired_layer_identifier]" description="">
  '<RASTER-SERVING-SERVICE_URL>/wmts/1.0.0/WMTSCapabilities.xml'
</mc:links>
<mc:links scheme="WMTS_KVP" name="[desired_layer_identifier]" description="">
  '<RASTER-SERVING-SERVICE_URL>/service?REQUEST=GetCapabilities&SERVICE=WMTS'
</mc:links>
<mc:links scheme="WMTS_BASE" name="[desired_layer_identifier]" description="">
  '<RASTER-SERVING-SERVICE_URL>/wmts'
</mc:links>
You need to save the [desired_layer_identifier] value for later use.
Get Layer Capabilities (Step 4)
The links we saw in the previous step are to other services associated with the specific layer, we can differentiate between them by their scheme attribute.
Now we need to fetch raster's MapServer specified layer metadata by sending a GetCapabilities request. Find the correct GetCapabilities URL by looking for the wanted layer's scheme="WMTS" attribute in the response of Step 1 and extract the url from it.
<mc:links scheme="WMTS" name="[desired_layer_identifier]" description="">
  '<RASTER-SERVING-SERVICE_URL>/wmts/1.0.0/WMTSCapabilities.xml'
</mc:links>
OR you can use wmts KVP capabilities
<mc:links scheme="WMTS_KVP" name="[desired_layer_identifier]" description="">
  '<RASTER-SERVING-SERVICE_URL>/service?REQUEST=GetCapabilities&SERVICE=WMTS'
</mc:links>
Make a GET request to this link. The response contains the details of all available layers in following format:
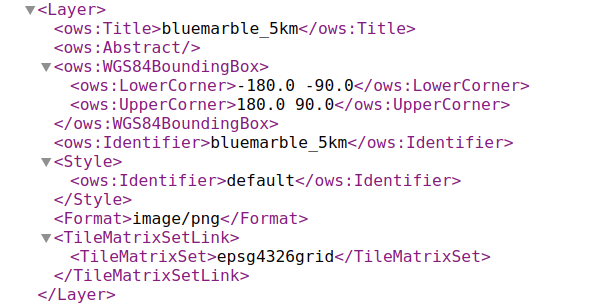
In the Response, look for layer where <ows:Identifier> is equal to the previously saved [desired_layer_identifier].
You can read more about GetCapabilities OGC format here 🌐
You need to save the style ows:Identifier, Format and TileMatrixSet values in order to consume the layer later on Step 5.
Alternative to Step 3, you may get the layer consumption url from the <ResourceURL/> element under the <Layer/> element. This gives a WMTS url template.
Construct Client side layer (Step 5)
Now, after you got all the values that you need by querying our catalog and Map Server capabilities, lets actually use it in order to display it in real map viewer / application (clients).
Below examples are based on Pseudo code, you will have to adapt it in your own application to make it work.
Important: only query parameter token is currently supported
- Cesium
- OpenLayers (v6.x)
- Leaflet (v1.x)
...
...
...

const catalogLayer = new Cesium.WebMapTileServiceImageryProvider({
      url : '<LAYER_WMTS_URL>',                         // from Step_3 or Step_4
      /*********************************************************************************/
      /********     WHEN AUTH IS REQUIRED                                       ********/
      /*********************************************************************************/
      // url:new Cesium.Resource({
      //  url: '<LAYER_WMTS_URL>',                      // from Step_3 or Step_4
      //  headers: { 'X-API-KEY': RASTER_TOKEN },       // received RASTER auth token
      //  queryParameters: { 'token': RASTER_TOKEN },   // received RASTER auth token -
      //}),
      layer : '[desired_layer_identifier]',             // from Step_3
      style : '<LAYER_STYLE>',                          // from Step_4
      format : '<LAYER_FORMAT>',                        // from Step_4
      tileMatrixSetID : '<LAYER_TILE_MATRIX_SET_ID>',   // from Step_4
      /*********************************************************************************/
      /********     TILING SCHEME SHOULD BE 2 x 1                               ********/
      /*********************************************************************************/
      tilingScheme: new Cesium.GeographicTilingScheme(),
      /*********************************************************************************/
      /********     EXTENT SHOULD BE AS MUCH AS CLOSE TO LAYER ORIGIN FOOTPRINT ********/
      /*********************************************************************************/
      rectangle : <LAYER_EXTENT>,                       // from Step_2
    });

map.addLayer(catalogLayer);
...
...
...
...
...
...
    const parser = new WMTSCapabilities();
    const capabilitiesResponse = await fetch('CapabilitiesURL');              // from Step_4
    const capabilitiesText = await capabilitiesResponse.text();
    const parserResult = parser.read(capabilitiesText);
    const layerOptions = optionsFromCapabilities(parserResult, {
      layer: '[desired_layer_identifier]'                                     // from Step_3
    });
    const layer = new TileLayer({ source: new WMTS(layerOptions), extent });  // from Step_2

    map.addLayer(layer);
...
...
...
  import L from "leaflet";
    ...
    ...
    ...
    //urlTemplate example: https://maps/api/raster/v1/wmts/test-orthophoto/{TileMatrixSet}/{TileMatrix}{TileCol}/{TileRow}.jpeg
    const parser = (urlTemplate) => {
      return wmtsUrl
    .replace("{TileMatrixSet}", '<LAYER_TILE_MATRIX_SET_ID>')         // from Step_4
    .replace("{TileMatrix}", "{z}")
    .replace("{TileRow}", "{y}")
    .replace("{TileCol}", "{x}");
    }

    const bounds = L.latLngBounds([
      [extent[1], extent[0]],                                         // from Step_2
      [extent[3], extent[2]],                                         // from Step_2
    ]);

    const urlTemplate = '<LAYER_WMTS_URL>'                            // from Step_3 or Step_4
    const parsedUrl = parser(urlTemplate)

    const map = L.map("map", { crs: L.CRS.EPSG4326 }).setView([0, 0], 0);
                                                                      //in case of queryParameter authentication:
    const layer = L.tileLayer(parsedUrl + '?token=${TOKEN}',{         // received RASTER auth token
      id : '<desired_layer_identifier>',                              // from Step_3
      bounds
    })

    map.addLayer(layer);
    ...
    ...
    ...
Replace all <> place holders with the real values that we got from all previous steps:
- url - should be replaced by the URL that you got from Step 3 or Step 4.
- layer - should be replaced with layer Product ID.
- style - should be replaced with the value that you got from Step 4.
- format - should be replaced with the value that you got from Step 4
- tileMatrixSetID - how can you get it? from Response from Step 4.
- tilingScheme
- rectangle - value should be the BBOX (extent that you got from Step 2).
- Note - extent taken from step 2 - where bbox is calculated.
Leaflet (1.x)
For headers api key see the following link: https://github.com/PaulLeCam/react-leaflet/issues/852#issuecomment-1495774676
Enrich Layer data (Step 6)
In order to present catalog items in your system you can use following fields:
- mc:productName
- mc:description
- ...
- rest Raster profile definition